Managing Secure Edge softclient deployments with VSA 10
NAVIGATION In VSA 10, navigate to Modules > Patch Management
PERMISSIONS Patch > Edit Policy permissions in VSA 10
This article describes the process to install and uninstall the Secure Edge softclient on a managed Windows endpoint with VSA 10.
BEFORE YOU BEGIN All endpoints to which you will be deploying the softclient must have the VSA 10 agent installed. To learn how to add an endpoint to your VSA instance, refer to Discovering and deploying systems.
Installing the Secure Edge softclient
To create a VSA 10 patch management policy and deploy the Secure Edge softclient to Windows endpoints, perform the following steps.
IMPORTANT The softclient install process may require a reboot of the target system to complete. To minimize disruption to your client environment, we recommend scheduling a maintenance window for the selected endpoint before proceeding.
-
In VSA 10, navigate to Modules > Patch Management > Policies.
-
Click Create Policy.
-
On the General tab, input a unique policy name and a brief description of its purpose.
-
Click the Windows Settings tab.
-
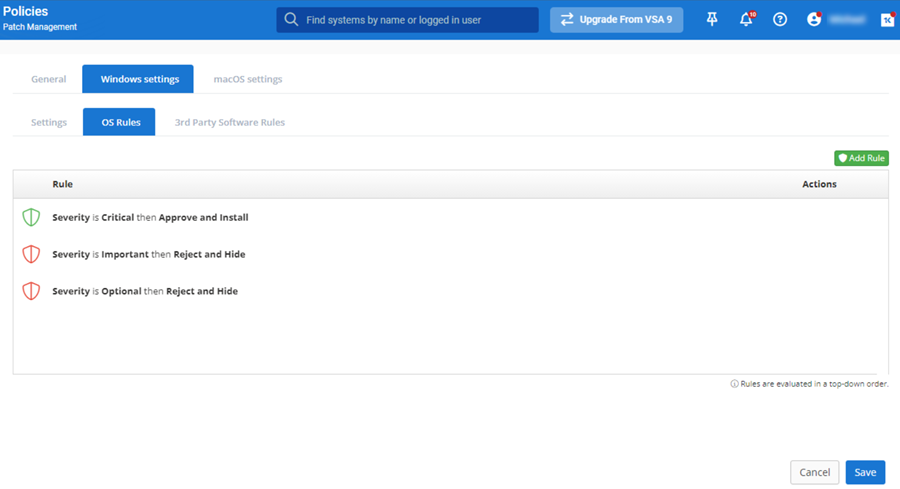
Select the OS Rules tab. Set the following rules:
-
Severity is Critical then Approve and Install
-
Severity is Important then Reject and Hide
-
Severity is Optional then Reject and Hide
-
-
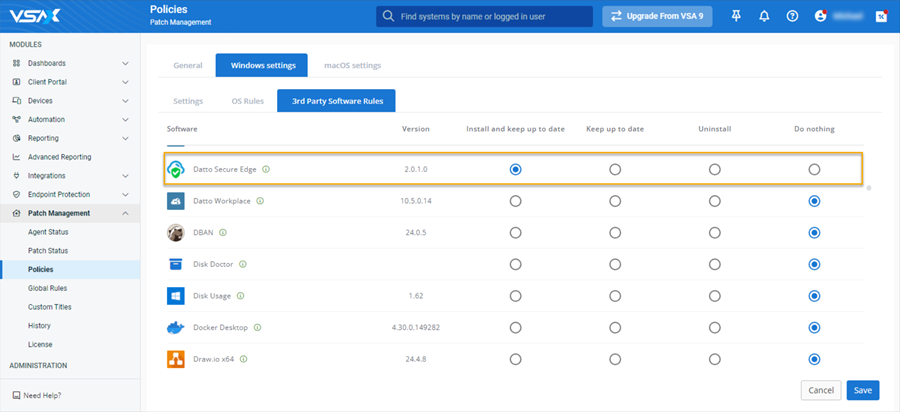
Click the 3rd Party Software Rules tab.
-
In the Software column, locate Datto Secure Edge and choose the Install and keep up to date option.
-
Click Save.
-
Navigate to Modules > Patch Management > Agent Status.
-
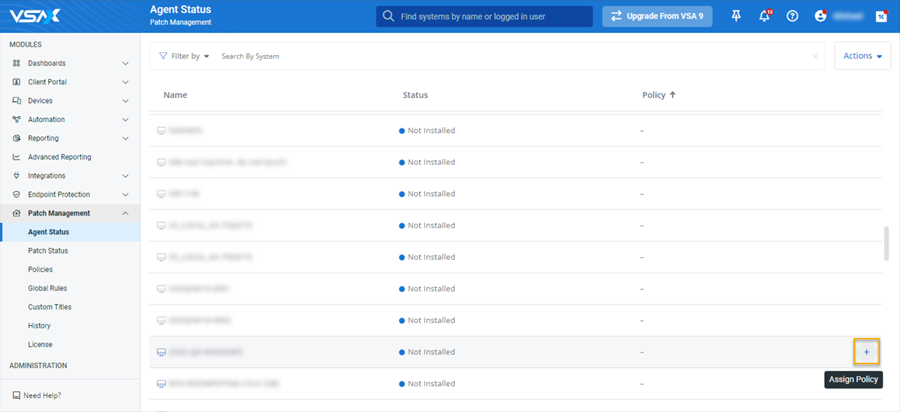
In the page table, locate the endpoint to which you'd like to deploy the Secure Edge softclient and move your mouse over its list entry.
-
Click the + icon in the Policy column.
-
The Agent Status - Assign Policy modal will open. From its drop-down menu, select the policy you created in the Create the install policy section of this article.
-
Click Assign Policy.
-
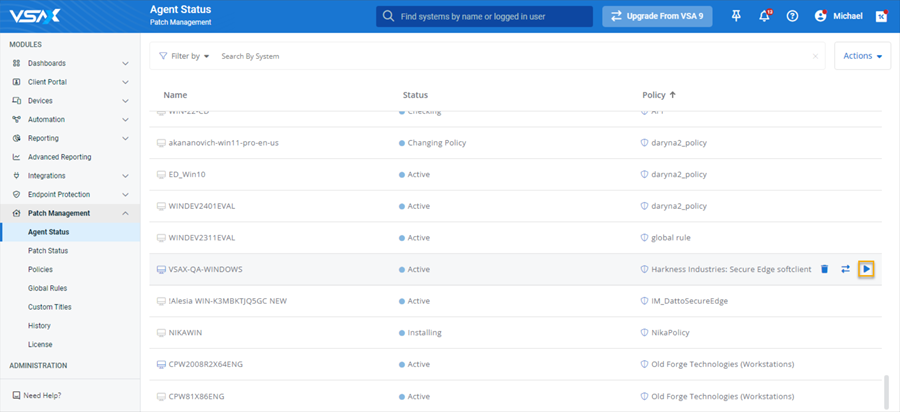
Move your mouse over the endpoint's list entry again and click the "play" icon in the Policy column.
-
Allow up to ten minutes for the policy to run and the installation to complete. Then, check the target endpoint to verify that the Secure Edge softclient has been installed. For details about configuring the softclient following deployment, refer to Authentication settings for Always-on VPN and Authentication settings for Identity Provider (IdP) .
Uninstalling the Secure Edge softclient
If you need to remove the Secure Edge softclient from an endpoint, you can do so by performing the following steps.
IMPORTANT The softclient uninstall process may require a reboot of the target system to complete. To minimize disruption to your client environment, we recommend scheduling a maintenance window for the selected endpoint before proceeding.
-
In VSA 10, navigate to Modules > Patch Management > Policies.
-
Click Create Policy.
-
On the General tab, input a unique policy name and a brief description of its purpose.
-
Click the Windows Settings tab.
-
Select the OS Rules tab. Set the following rules:
-
Severity is Critical then Approve and Install
-
Severity is Important then Reject and Hide
-
Severity is Optional then Reject and Hide
-
-
Click the 3rd Party Software Rules tab.
-
Locate Datto Secure Edge and choose the Uninstall option.
-
Click Save.
-
In VSA 10, navigate to Modules > Patch Management > Agent Status.
-
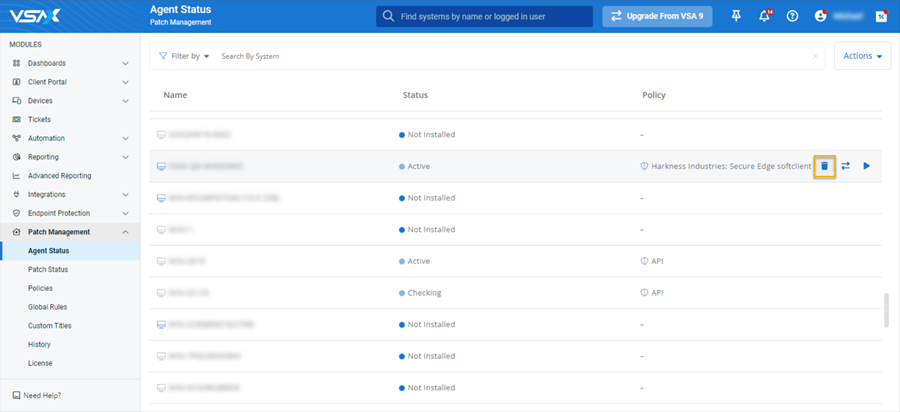
In the page table, locate the endpoint from which you'd like to remove the Secure Edge softclient and move your mouse over its list entry.
-
Click the "wastebasket" icon in the Policy column to remove the existing policy.
-
Move your mouse over the endpoint's list entry again and click the + icon in the Policy column.
-
The Agent Status - Assign Policy modal will open. From its drop-down menu, select the policy you created in the Create the uninstall policy section of this article.
-
Click Assign Policy.
-
Move your mouse over the endpoint's list entry and click the "play" icon in the Policy column to run the policy.
-
Allow up to ten minutes for the policy to run and the uninstall to complete. Then, check the target endpoint to verify that the Secure Edge softclient has been removed.
