Configure your Cloud Gateway
NAVIGATION Partner Portal > Networking Status > Network Manager > Manage > Secure Edge
This article provides a high-level walk-through for setting up your Secure Edge networking environment in the Datto Partner Portal.
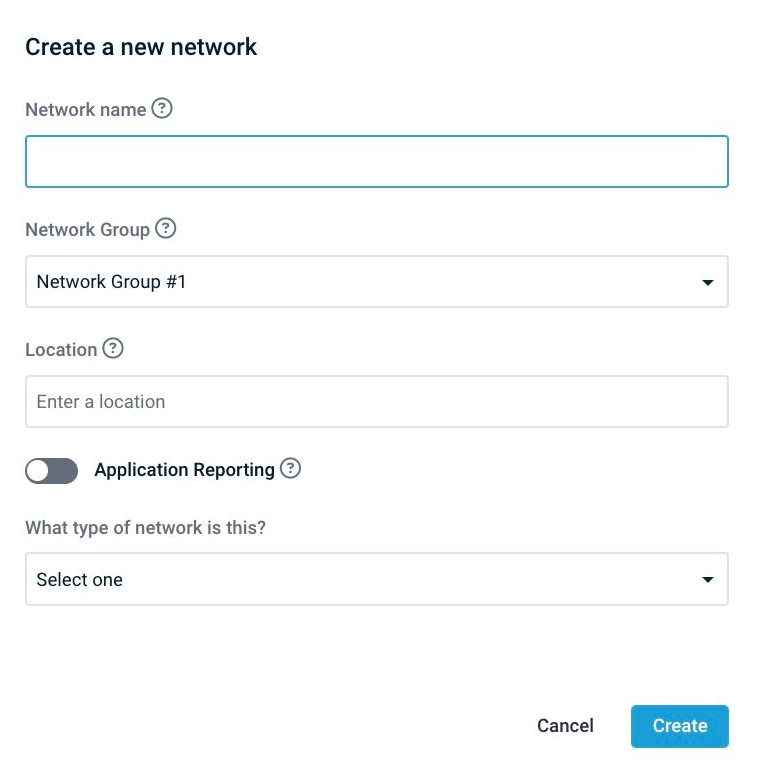
This process assumes that a Network has already been created. If a network is needed please refer to: Creating a Network in Network Manager.
-
Navigate to portal.dattobackup.com
-
Log in with your Partner Portal credentials.
-
From the header menu, select Status > Networking Status.
-
Click on the Launch Network Manager button.

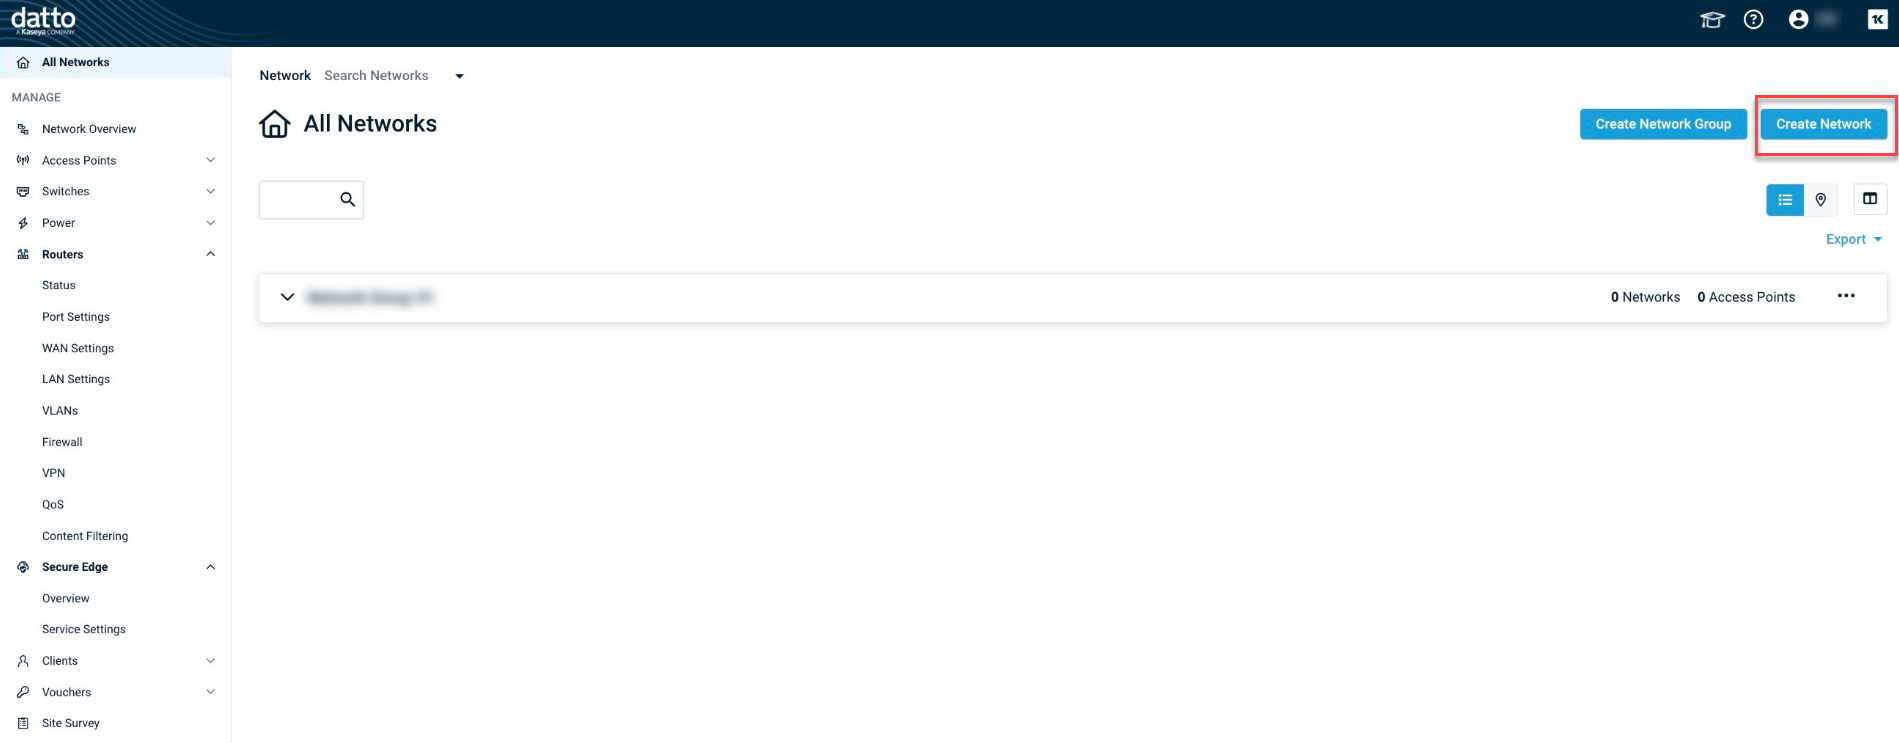
The All Networks page will be displayed.
-
Click the Create Network button to create a new network or select the network to use with the Secure Edge gateway.
-
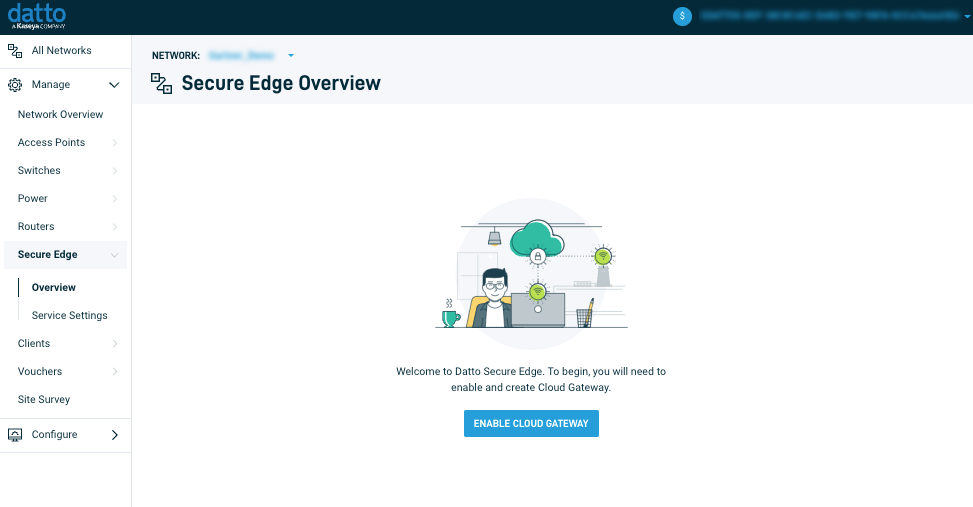
Click Enable Cloud Gateway. A confirmation prompt will appear to confirm the use of an unassigned Gateway Subscription or to purchase a new Gateway Subscription. After making a selection and checking the acknowledgment box, click Continue to acknowledge and proceed.
Configure service settings
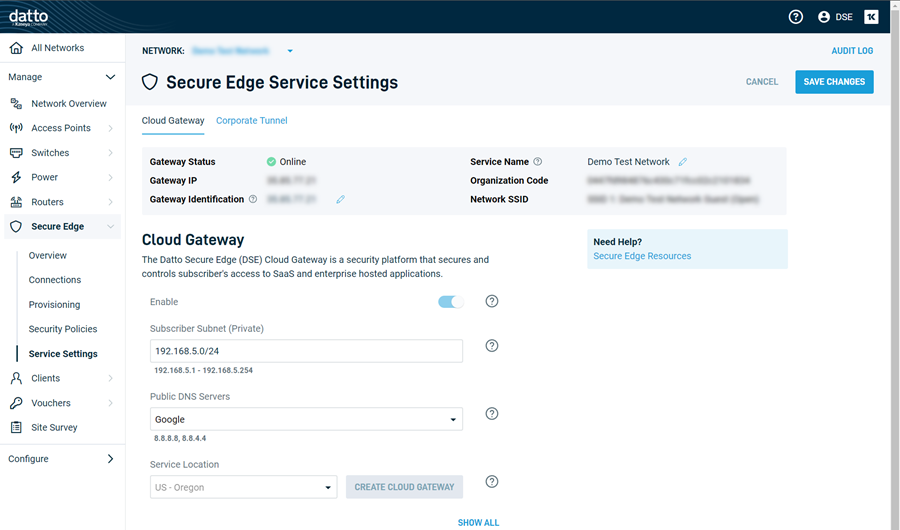
Once your Cloud Gateway is enabled, you can personalize the networking settings it will use to connect to your infrastructure. From within Network Manager, navigate to Manage > Secure Edge > Service Settings. Then, select a page tab or page section to continue.
-
On the Cloud Gateway tab, complete the following fields:
- Subscriber Subnet (Private)
- Public DNS Servers
- Service Location
-
After confirming the settings, click Create Cloud Gateway.
-
Once prompted to authorize the monthly recurring service charge for the new gateway, click Confirm Charges to continue.
Before your subscribers can start using the Secure Edge service, you'll need to define the method by which your network environment will identify and authenticate them. To do so, perform the following steps:
-
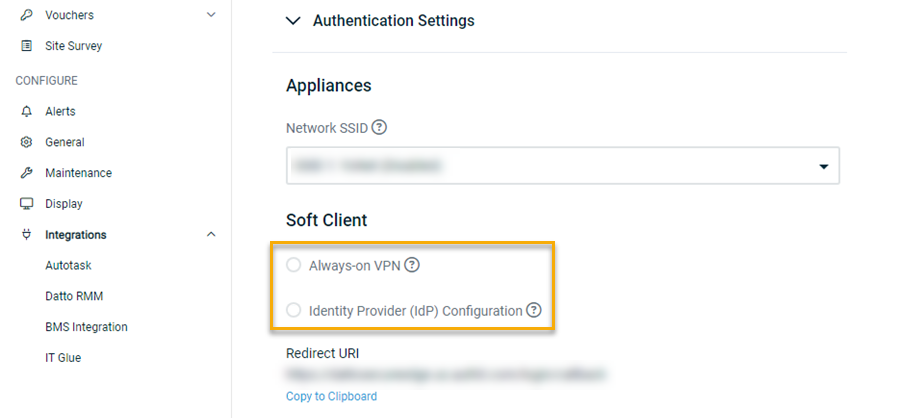
Scroll to the Authentication Settings section of the Cloud Gateway tab.
-
From the Network SSID drop-down menu, select the WPA-authenticated wireless network (SSID) to which your users should connect for VPN service. To keep things simple for your end users, the network SSID you select should be the same WiFi network that is available at their corporate location.
NOTE SSIDs that use open authentication or splash pages are not supported.
-
Next, navigate to the Soft Client section of the page. You'll be presented with two different methods by which your users can authenticate to the network:
-
Always-on VPN, delivers an automated sign-in workflow that requires no interaction from the subscriber.
-
Identity Provider (IdP) Configuration, employs a traditional sign-in process that requires the subscriber to launch the Secure Edge client and enter a username and password.
-
Select a topic to continue.
With Always-on VPN enabled, once the endpoint boots, the Secure Edge client automatically starts and authenticates approved clients to the network without the need for user interaction. Users cannot disable this type of connection. If disconnected, the Secure Edge client will attempt to reconnect every five minutes.
Prerequisites
IMPORTANT Before activating this authentication method, ensure you're familiar with the following requirements and considerations for its use.
-
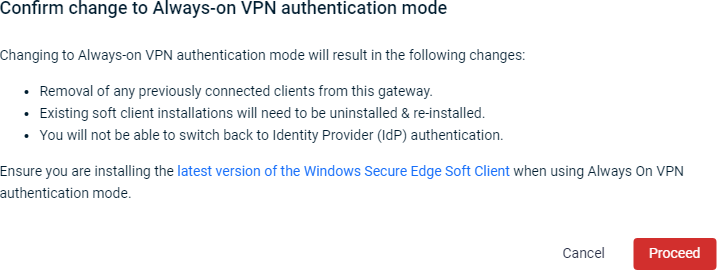
If you select Always-on VPN, you cannot select Identity Provider (IdP) in the future.
-
Secure Edge Gateways can only host one authentication mode at a time. If you need to use Always-on VPN and Identity Provider (IdP) at the same time, you will need to deploy two separate Gateways to support the dual configuration.
Procedure
To leverage Always-on VPN, perform the following steps:
-
In Network Manager, navigate to Secure Edge > Service Settings > Cloud Gateway > Authentication Settings > Soft Client.
-
Select the Always-on VPN authentication option.
-
You'll see a prompt similar to the following example. Review the information it provides. To finalize your authentication mode selection, click Proceed.
-
Scroll to the top of the Service Settings page and click Save Changes. Secure Edge will begin enforcing always-on authentication for the selected network.
The Secure Edge client will always connect to the Secure Edge Gateway. If it is preferred to use the onsite Firewall when on a trusted corporate network, as opposed to the Secure Edge Gateway, then the Secure Edge softclient will need to be prevented from reaching the gateway. This can be accomplished with the following Firewall filter rule, to prevent the connection:
- Source IP - Any
- Destination IP - IP address of the Secure Edge Cloud Gateway
- Protocol - UDP
- Source Port - Any
- Destination Port - 25570
- Action – Filter
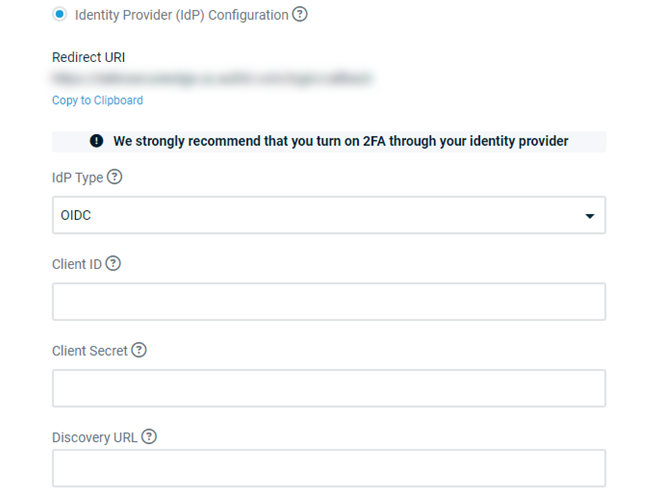
The Identity Provider (IdP) option enables you to leverage the identity provider you define to authenticate endpoints to your network. In this mode, your subscriber must boot the endpoint, log in to the operating system, launch the Secure Edge client, and authenticate to the network via an OIDC-compliant identity provider. Secure Edge can communicate with Microsoft, Azure, Active Directory on Windows Server, and Google authentication providers.
IMPORTANT Before activating this option, you'll need to ensure your third-party IdP is correctly configured for use with Secure Edge. For deployment guidance, consult the articles listed below.
Prerequisites
- Setup WiFi on the Secure Edge Appliance
- Setting up Microsoft Entra ID for use with Secure Edge
- Using Google Identity with Secure Edge
Procedure
To set up Identity Provider (IdP) authentication, perform the following steps:
-
In Network Manager, navigate to Secure Edge > Service Settings > Cloud Gateway > Authentication Settings > Soft Client.
-
Select the Identity Provider (IdP) authentication option.
-
The IdP Type drop-down menu will appear. Choose a supported authentication type to continue.
-
Complete the following fields:
-
Client ID: Input the identifier that the IdP assigned to your Secure Edge application.
-
Client Secret: Provide the secret key generated by the IdP for the application.
-
Discovery URL: Enter the URL of your IdP's authentication endpoint. Network Manager will check this value for a valid response after you click out of the field. If it does not receive one, you'll be prompted manually define the endpoint URLs.
-
-
If you see a green check mark next to the Discovery URL setting, then the identity provider is correctly configured. Scroll to the top of the Service Settings page and click Save Changes. Secure Edge will begin enforcing IdP authentication for the selected network.
On the Cloud Gateway tab, in the Tunnel Settings section, you can also configure Split Tunneling and Full Tunneling. These features enable you to define traffic that should be included inside the secure tunnel between the Secure Edge appliance or softclient and the Cloud Gateway versus traffic that should go straight to the internet.
When setting up the feature, there are two options available to you.
Include specific traffic into the VPN: This configuration is known as "Split Tunneling." Designated traffic does not enter the VPN and is directed to the internet unsecured. If you do not specify a network range or domain address in the include settings, this rule will apply to all traffic when selected.
Exclude: This configuration is known as "Full Tunneling," All traffic is directed into the secure tunnel toward the Cloud Gateway unless you configure a network range or domain name in the exclude settings.
For split tunneling best practices, review Recommended tunnel settings for high bandwidth services. To learn more about tunnel configuration, consult the Service setup section of our content.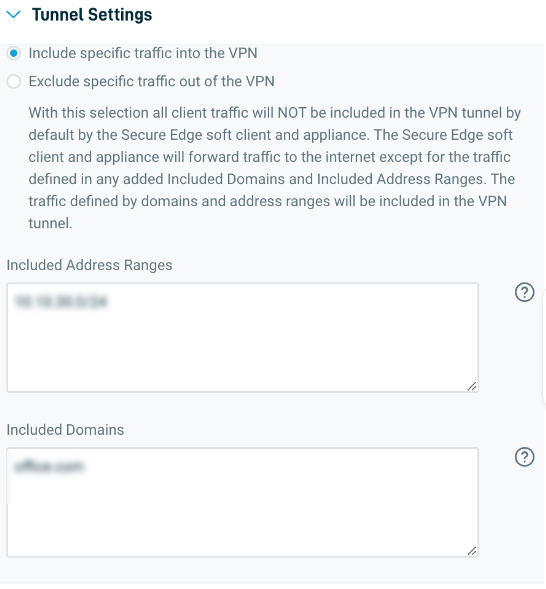
With Datto Networking, you have the ability to configure your switches, access points, and Secure Edge Gateways to send curated sets of syslog events to Managed Security Operations Centers (SOCs) and SIEM tools. These logs are useful for identifying potential Indicators of Compromise (IoCs) in your environment. While this step is optional, we recommend doing so to ensure you have the most comprehensive threat hunting data available. Learn more in our Leveraging the Datto Networking Managed SOC integration article.
This step is optional. If there are resources on the corporate site that need to be accessed remotely by Secure Edge users, you can set up a corporate tunnel for their use on the Corporate Tunnel tab. Configure the tunnel to connect to a router or firewall that supports branch-to-branch IPSEC.
Refer to the section of our Knowledge Base for additional details about corporate tunnel configuration.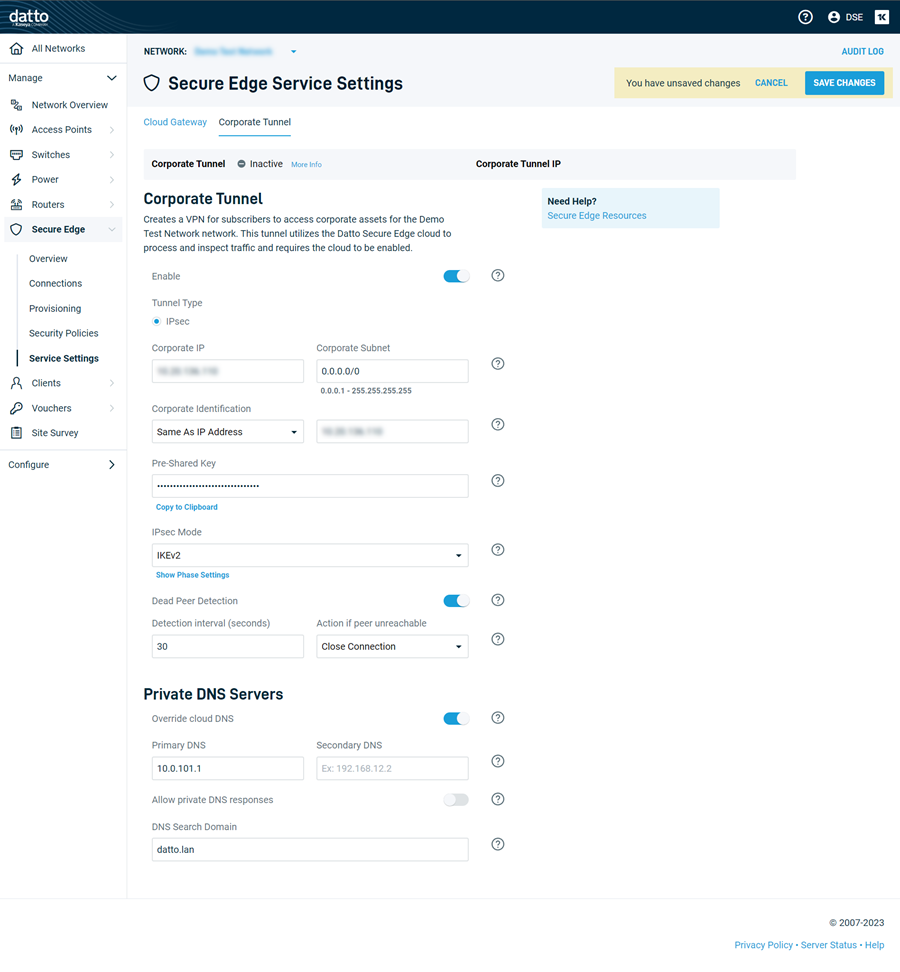
Configure security settings
Next, navigate to Manage > Secure Edge > Security Policies and configure the DNS Filter and Application Control settings to protect your users against harmful content and prioritize network traffic. Refer to Managing subscriber security policies to learn more.
Next steps
Are you deploying the Secure Edge solution for the first time? Follow the below steps to continue.
IMPORTANT Before proceeding to Step 2, ensure that you have configured your authentication provider as described in the Authentication Settings section of this article. If you do not do so, the softclient activation will fail.
