Setting Up a DNA Client VPN Using OpenVPN or Tunnelblick
Topic
This article will guide you through setting up a VPN connection using OpenVPN or Tunnelblick.
Environment
- Datto Networking Appliance (DNA)
- OpenVPN
Purpose
This feature allows a user to configure an SSL Client VPN connection using the same client VPN feature currently in place.
Requirements
- DNA firmware v0.9.0.64 or higher
- OpenVPN installed on the PC you will be using to connect to the DNA
You must use the actual OpenVPN client. OpenVPN Connect will not function properly.
Process
Configure Client VPN on the DNA
Follow the steps described in DNA: Client VPN to configure your Datto Networking Appliance. Then, proceed to the Install and Configure the VPN Client section of this article.
Install and Configure the VPN Client
Windows
1. Download and install the OpenVPN Windows installer (external link). Then, proceed to the Download the OpenVPN Config File section of this article.

Figure 1: OpenVPN Windows Installer
Linux
1. Install the OpenVPN package:
sudo apt-get install openvpn
Then, proceed to the Download the OpenVPN Config File section of this article.
Mac
1. If you are using a Mac, you will need to install Tunnelblick instead of OpenVPN. Then, proceed to the Download the OpenVPN Config File section of this article.
Download the OpenVPN Config File
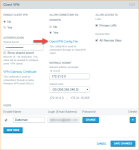
2. Download the OpenVPN config file from the DNA to the target computer by clicking the OpenVPN Config File on the Client VPN card (Figure 2).
- For Windows clients, save the file to
%systemroot%\Program Files\OpenVPN\config. - For Linux and Mac clients, save the file to the desktop.

Figure 2: OpenVPN Config File download link
Connecting the VPN Client
Windows
1. Open the OpenVPN client and click connect.
2. To log on to the network, use the email address from the username and password you created earlier on the Client VPN card.
Linux
1. Launch OpenVPN with the --config argument to specify the configuration file to use:
openvpn --config client.ovpn
Mac
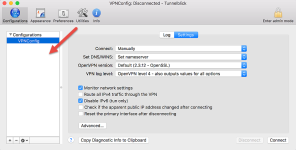
1. Add the config file you saved in the Download the OpenVPN Config File section of this article to Tunnelblick by dragging it from the desktop into the left-hand pane shown in Figure 3.

Figure 3: Tunnelblick settings pane
2. Select the configuration in the Configurations sidebar, and click Connect.
3. Log in using the credentials you created in the DNA: Client VPN article.


